When genlocking in dual dongle configuration a serial terminal such as Arduino IDE’s console can be attached to MewPro #0 that is on the back of GoPro #0 (see top-right of the following figure).
Any sensors or switches can be also installed to the board and they will work for starting/stopping of all cameras.
Note: In single dongle configuration the controlling GoPro #0 has no MewPro board attached. So the method described in this post is not relevant.
Tips on Arduino Console
Output displayed in console is nothing but I2C command sent to Dual Hero Bacpac.
Console settings are: baud [57600], enter key emulation [Newline].
Compile MewPro with #undef UART_RECEIVER_DISABLE (this is the default).
The I2C command you type in is not displayed at all but don’t worry it is surely sent to GoPro #0.
To start recording type “SY1”. This will start all cameras.
To stop recording type “SY0”. This will stop all cameras.
Power on/off all cameras is done by “@” and “PW0”, respectively.
Change mode command “CM” and so on works only for GoPro #0.
In order to distribute the changes to other cameras, type “td”.
“UM” command is special. The command is not sent to Dual Hero Bacpac but sent to all cameras.
Two new products, MewPro Cable for genlocking GoPro and MewPro 2 for general purposes are available in our shop.
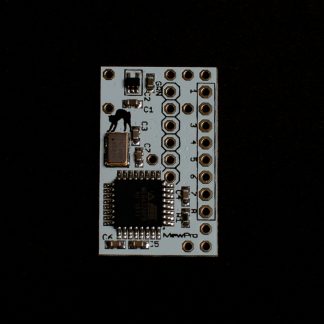
MewPro Cable
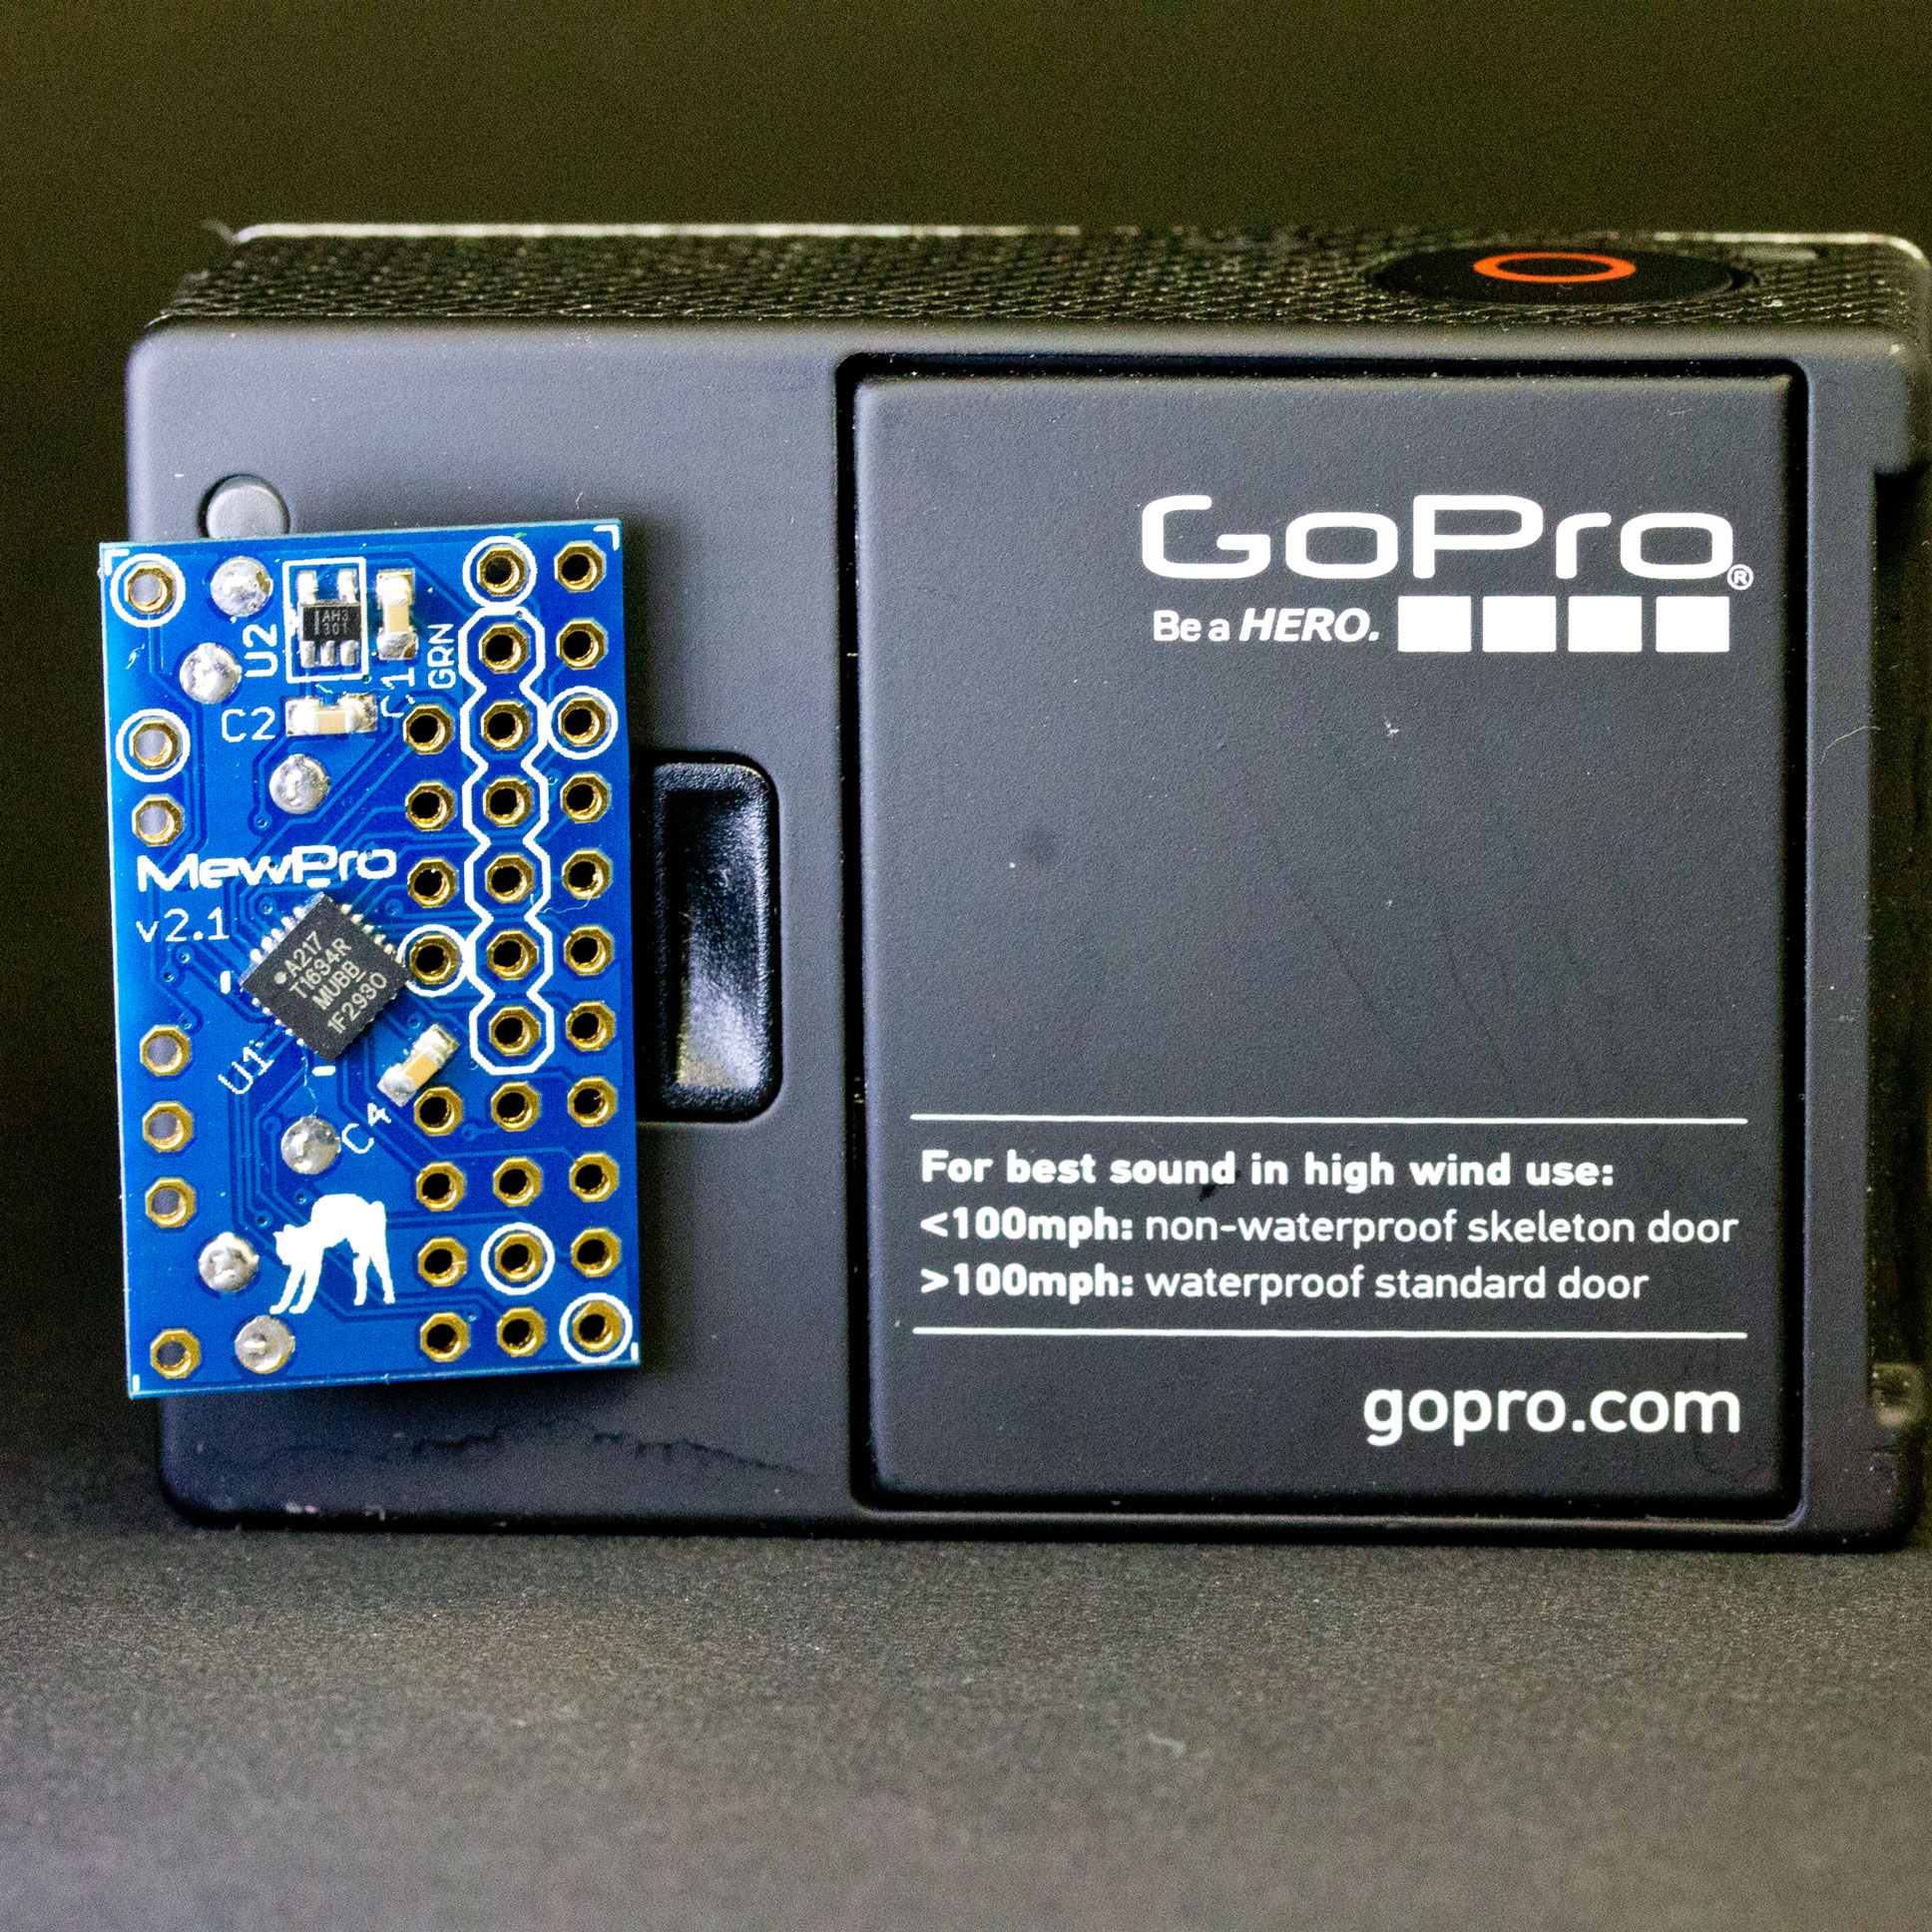
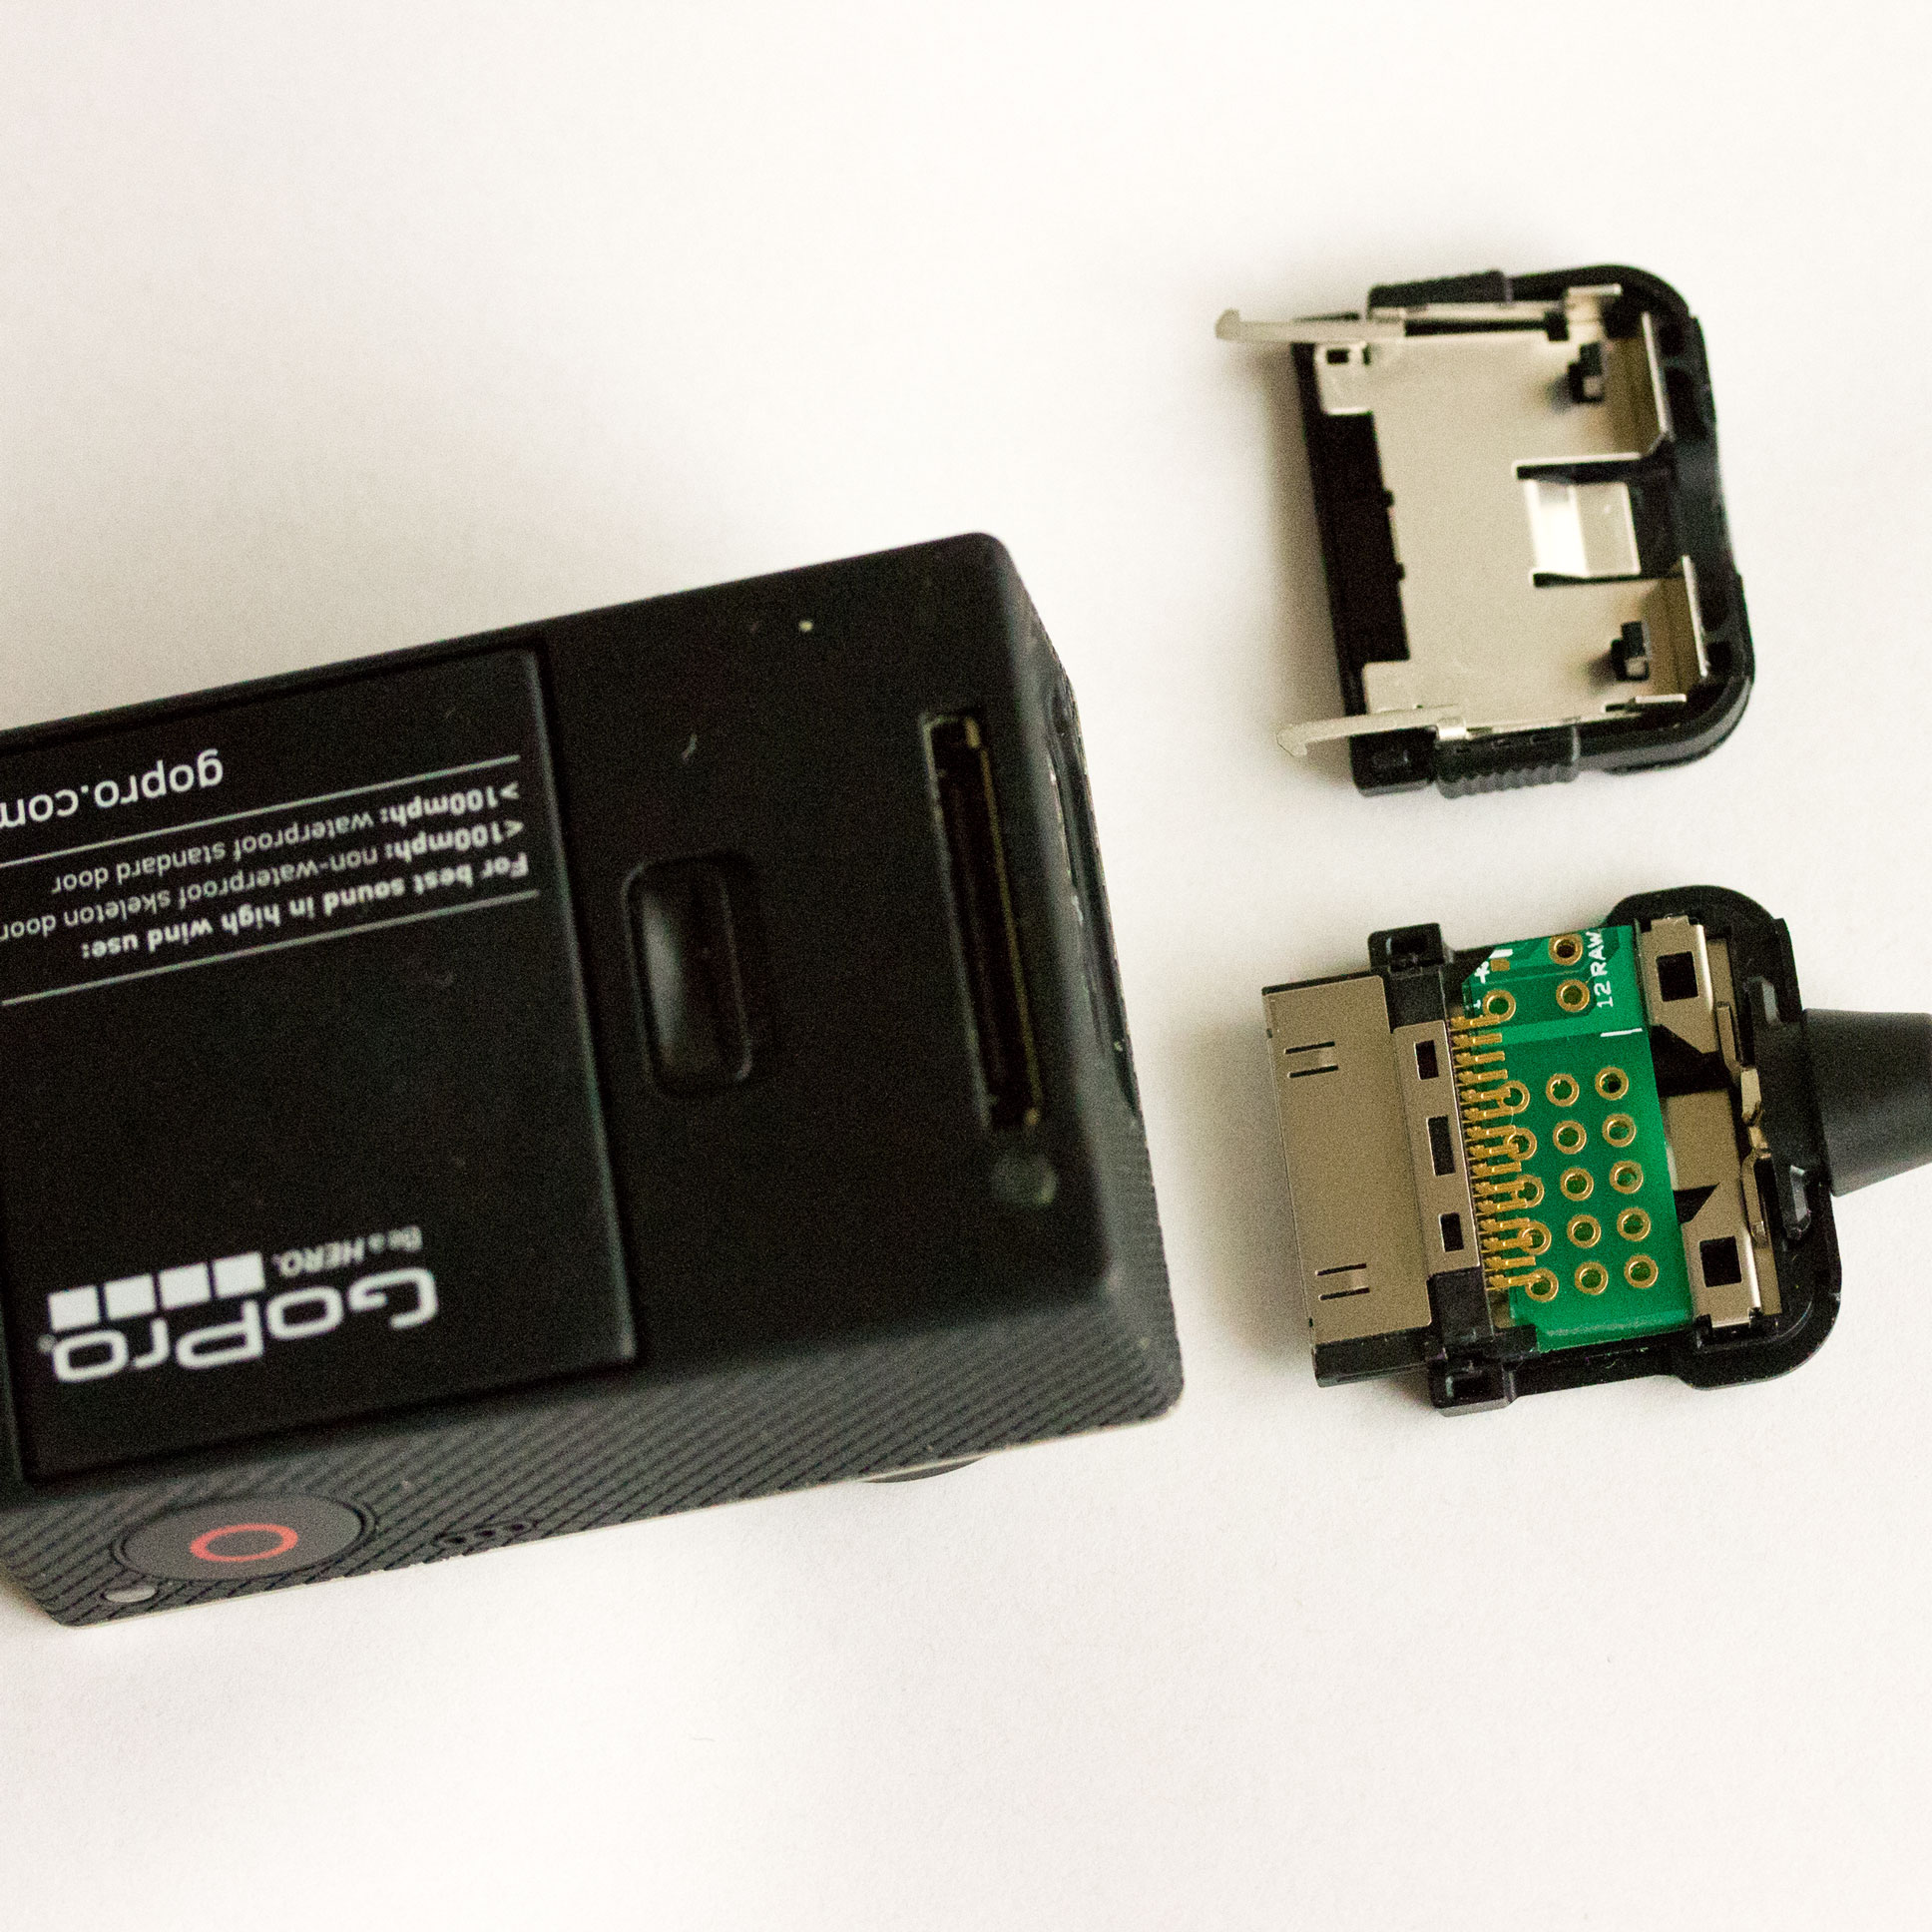
MewPro Cable is designed for genlocking GoPro Hero 3+ Black cameras. It has a microcontroller ATtiny1634 inside the plug enclosure and controls camera into 3D capture mode as easy as just plug the connector into Herobus socket. For genlock purpose it is interchangeable to our previous product “MewPro 1 w/ SMD parts, Herobus connector and Arduino Pro Mini compatible (soldered)”.
As there were many requests from our customers that if there were a plug-and-play genlock solution, now we sell bare plugs as well as fully assembled/soldered, plug-and-play packs with cables and Dongle(s). But we should say soldering a lot of wires to small plugs and dongle is extremely weary task. So if you order a plug-and-play pack please allow us minimum of 4 days before ship.
An article, introduction to MewPro Cable is to appear soon.
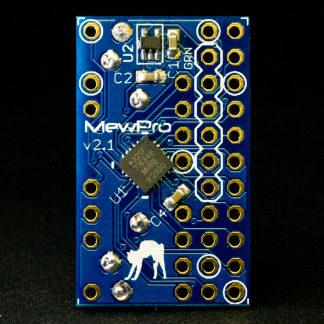
MewPro 2
MewPro 2 uses the microcontroller ATtiny1634 and is a redesigned version of MewPro 1 that used in conjunction with Arduino Pro Mini. All signals of Herobus and the microprocessor are broken out to 2.54mm pitch pins for hand-soldering convenience. ATtiny1634 can act as complete I2C slave, hence the new board comes without I2C EEPROM that is emulated.
A new product MewPro Cable is coming on the next month. It is targeted at possible MewPro Dongle or genlock users who has less room at the back of GoPros on their rig.
MewPro Cable has following features.
PCB fits within Herobus male connector casing.
Compatible with MewPro’s version w/ Arduino Pro Mini etc.
Works with MewPro Dongle.
For genlocking delete/align unnecessary/necessary pins.
That is, the current product MewPro w/ Arduino Pro Mini will be shrunk to the size of PCB (green) in the photo below:
(Note: The PCB in the photo is a fake and not an actual one because it is not ready, yet.)
The price will be the same as before.
Technical Details
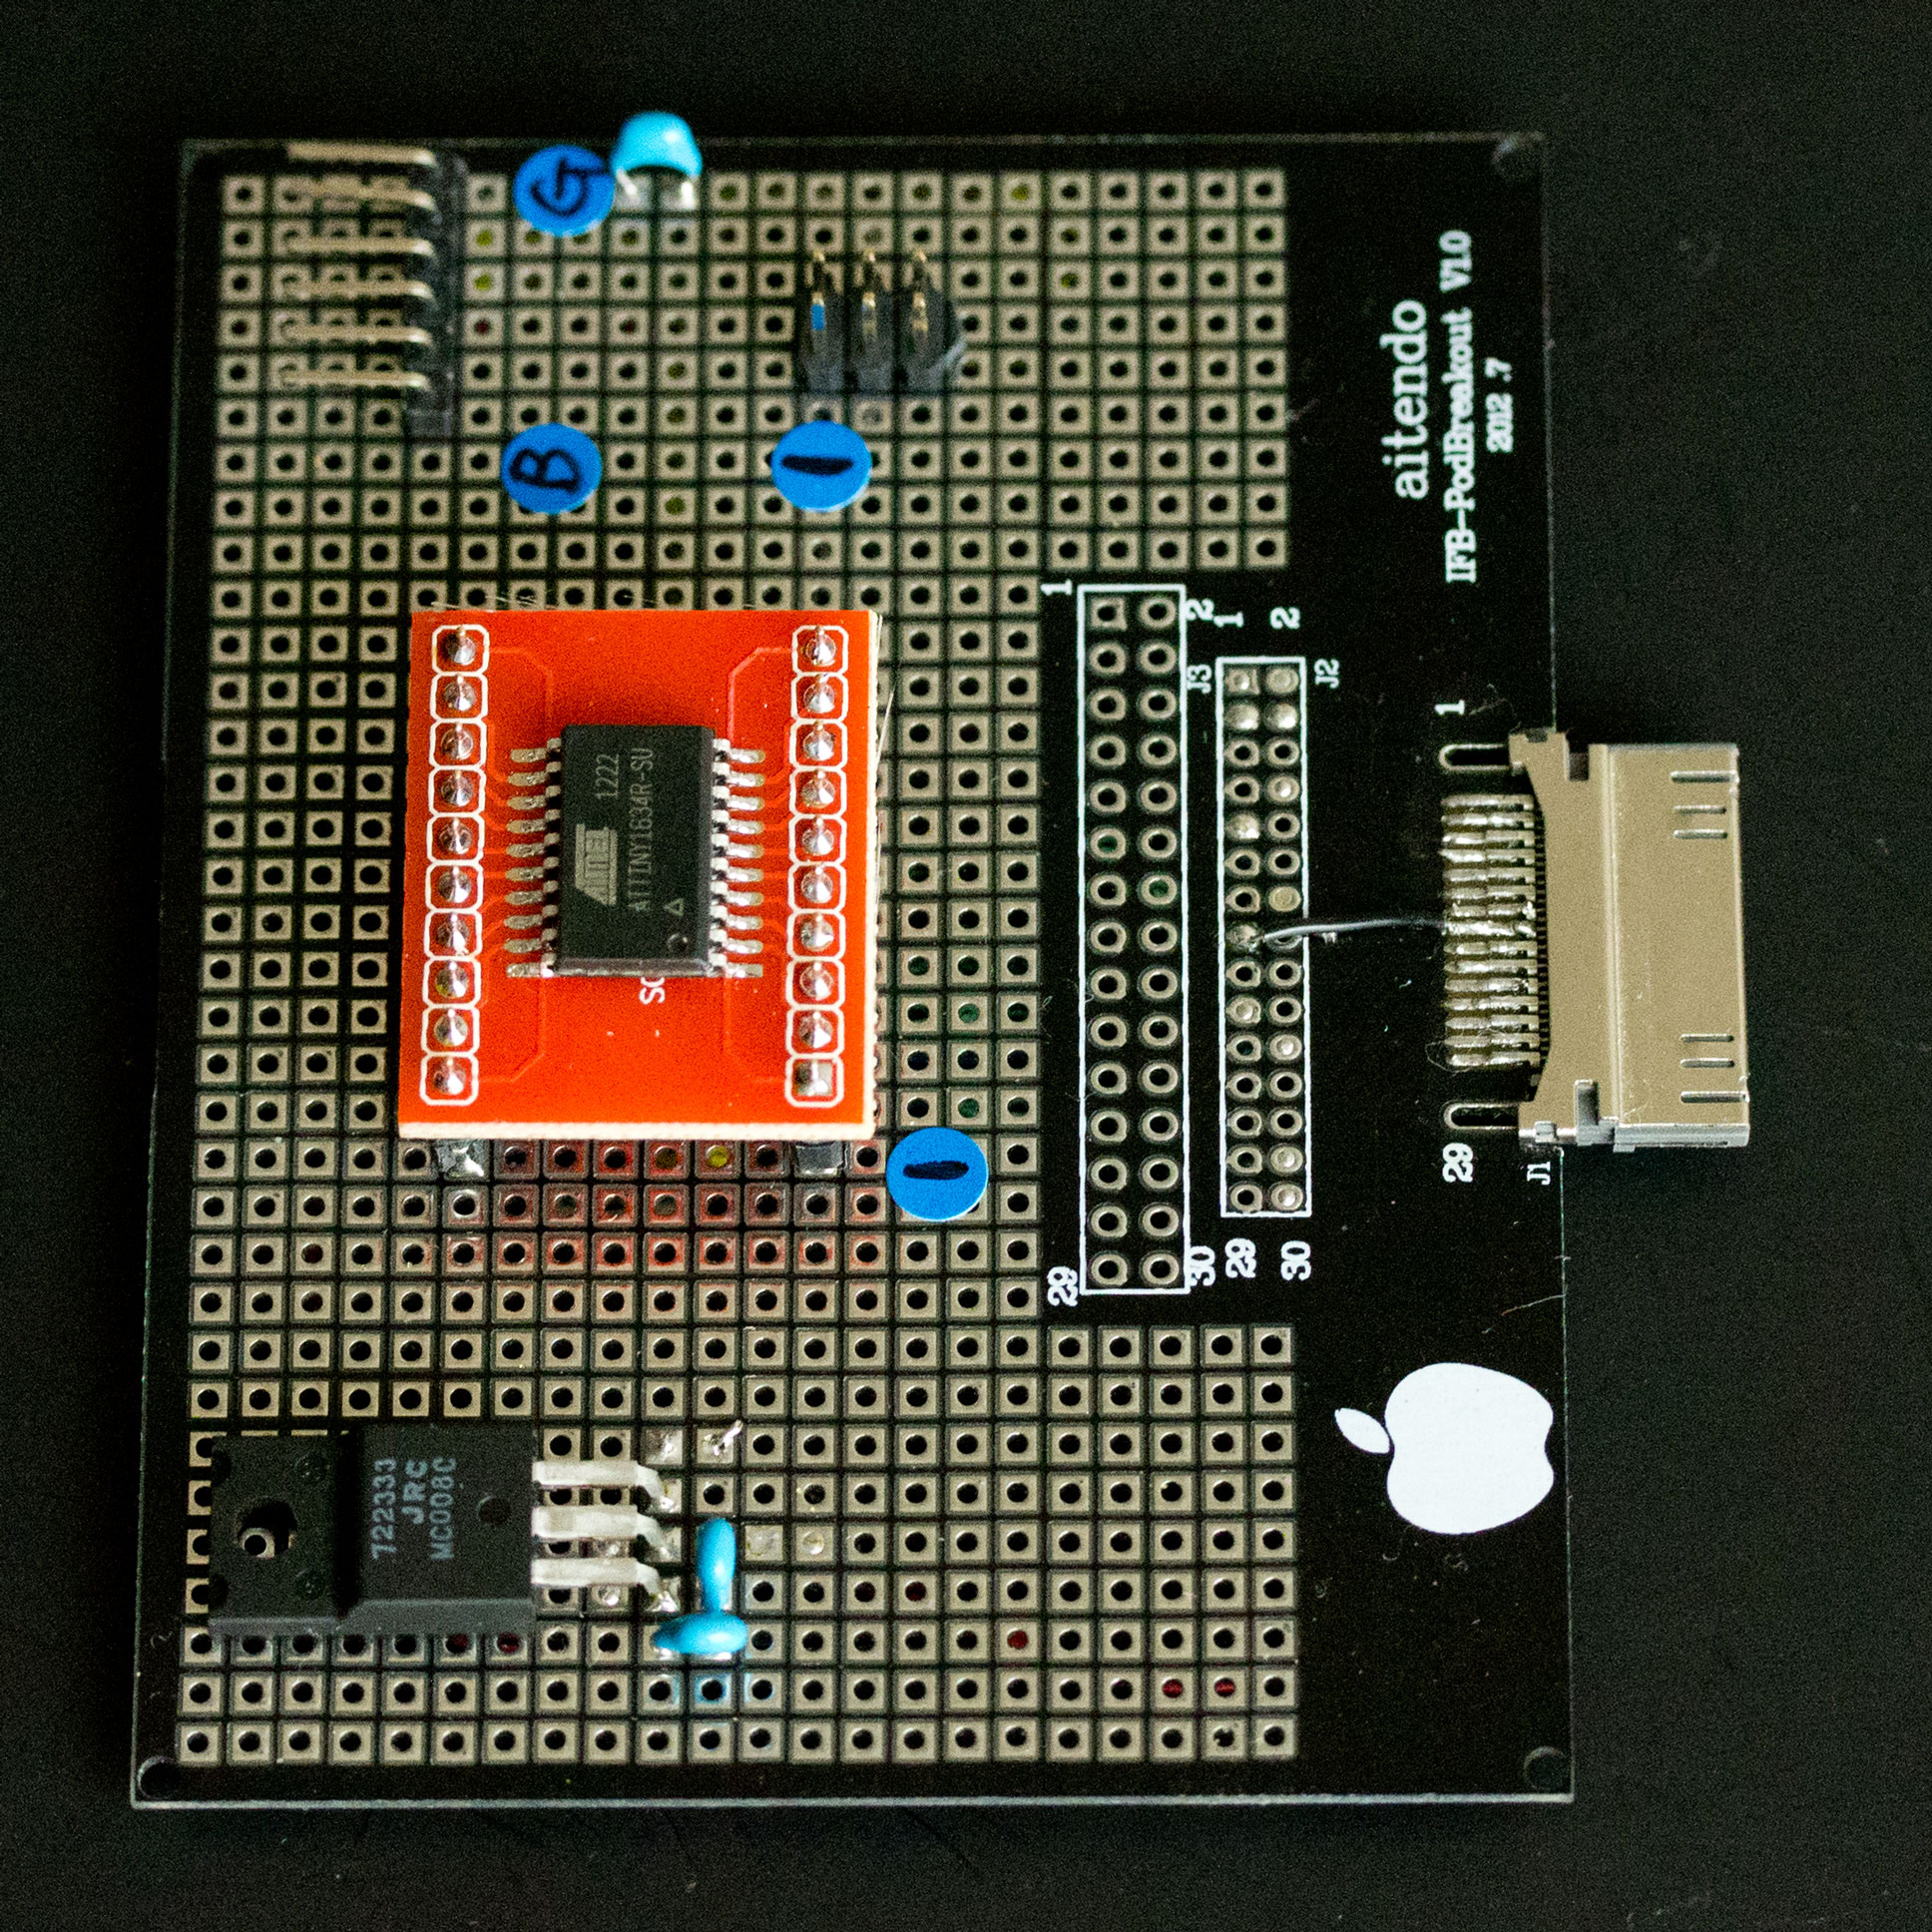
MewPro Cable uses AVR ATtiny1634 as microcontroller and this is different from current MewPro that uses AVR ATmega328.
Since ATtiny1634 is newer than ATmega328, it has a sophisticated, perfect slave I2C hardware. This new I2C architecture enables us to eliminate the necessity of external I2C EEPROM in order GoPro camera to recognize MewPro as mimicked Dual Hero System.
To use ATtiny1634’s great I2C hardware, we made WireS library from scratch. The library is usable under Arduino IDE and downloadable from GitHub (https://github.com/orangkucing/WireS).
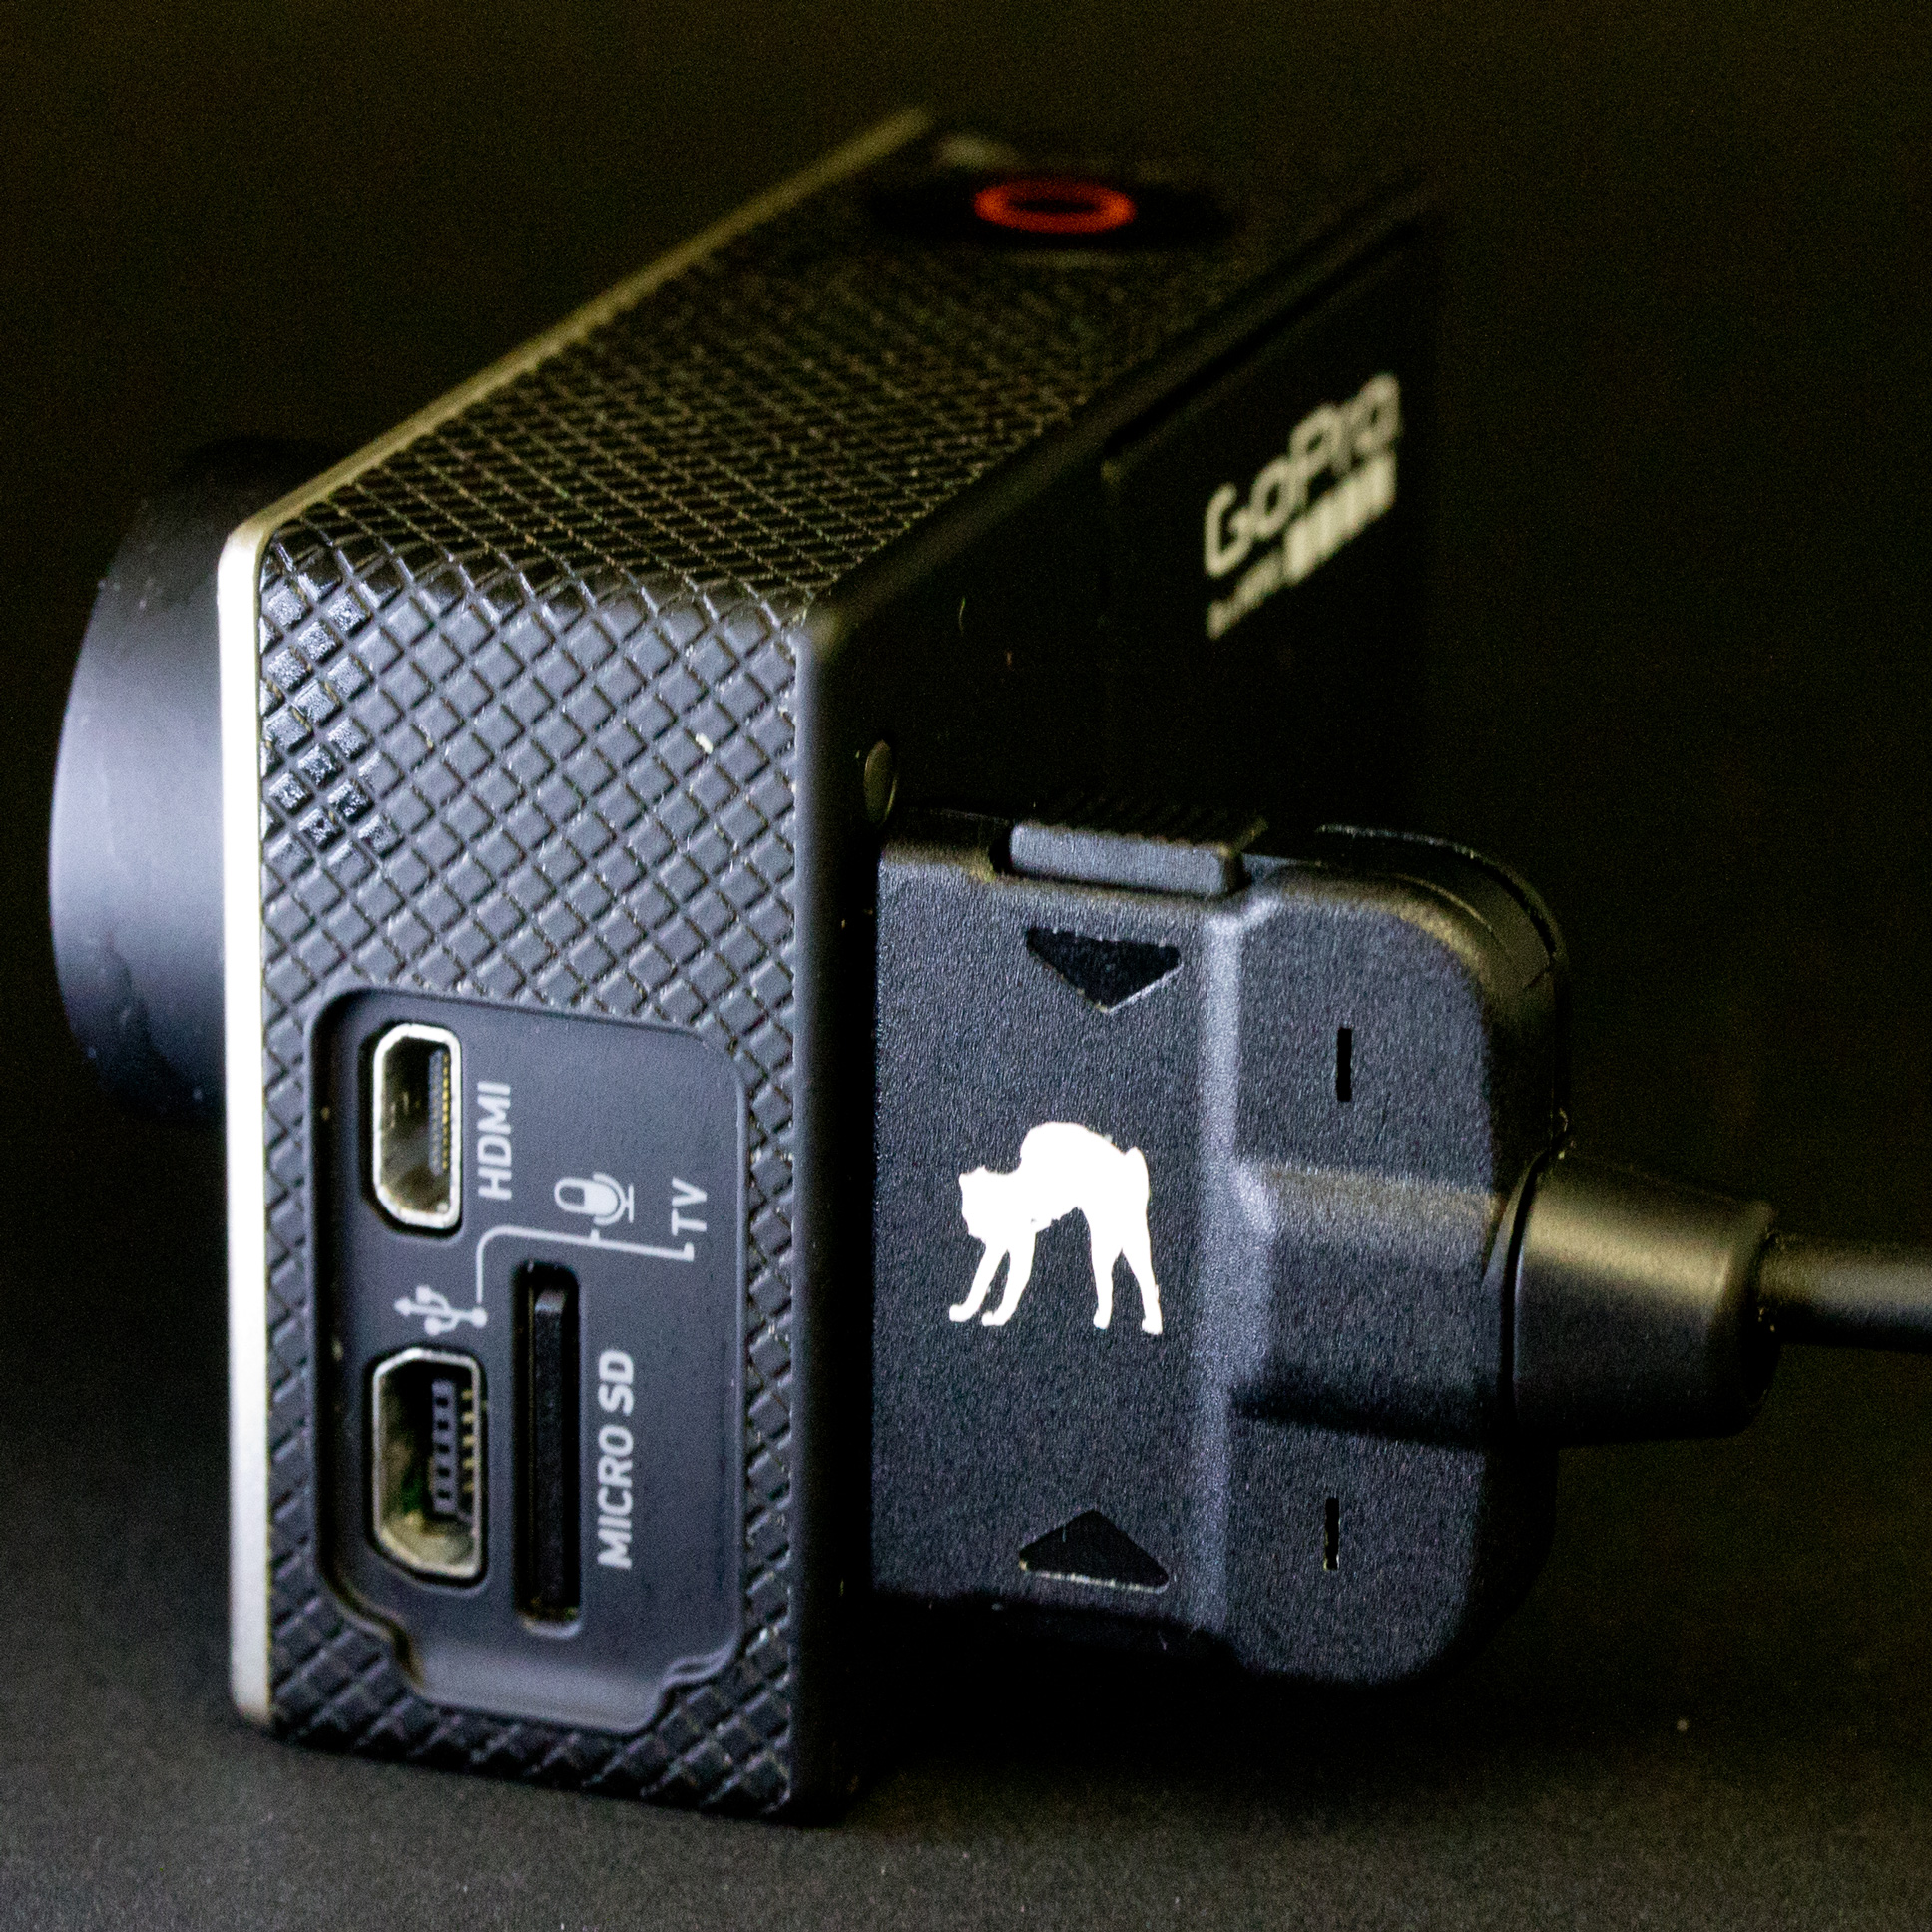
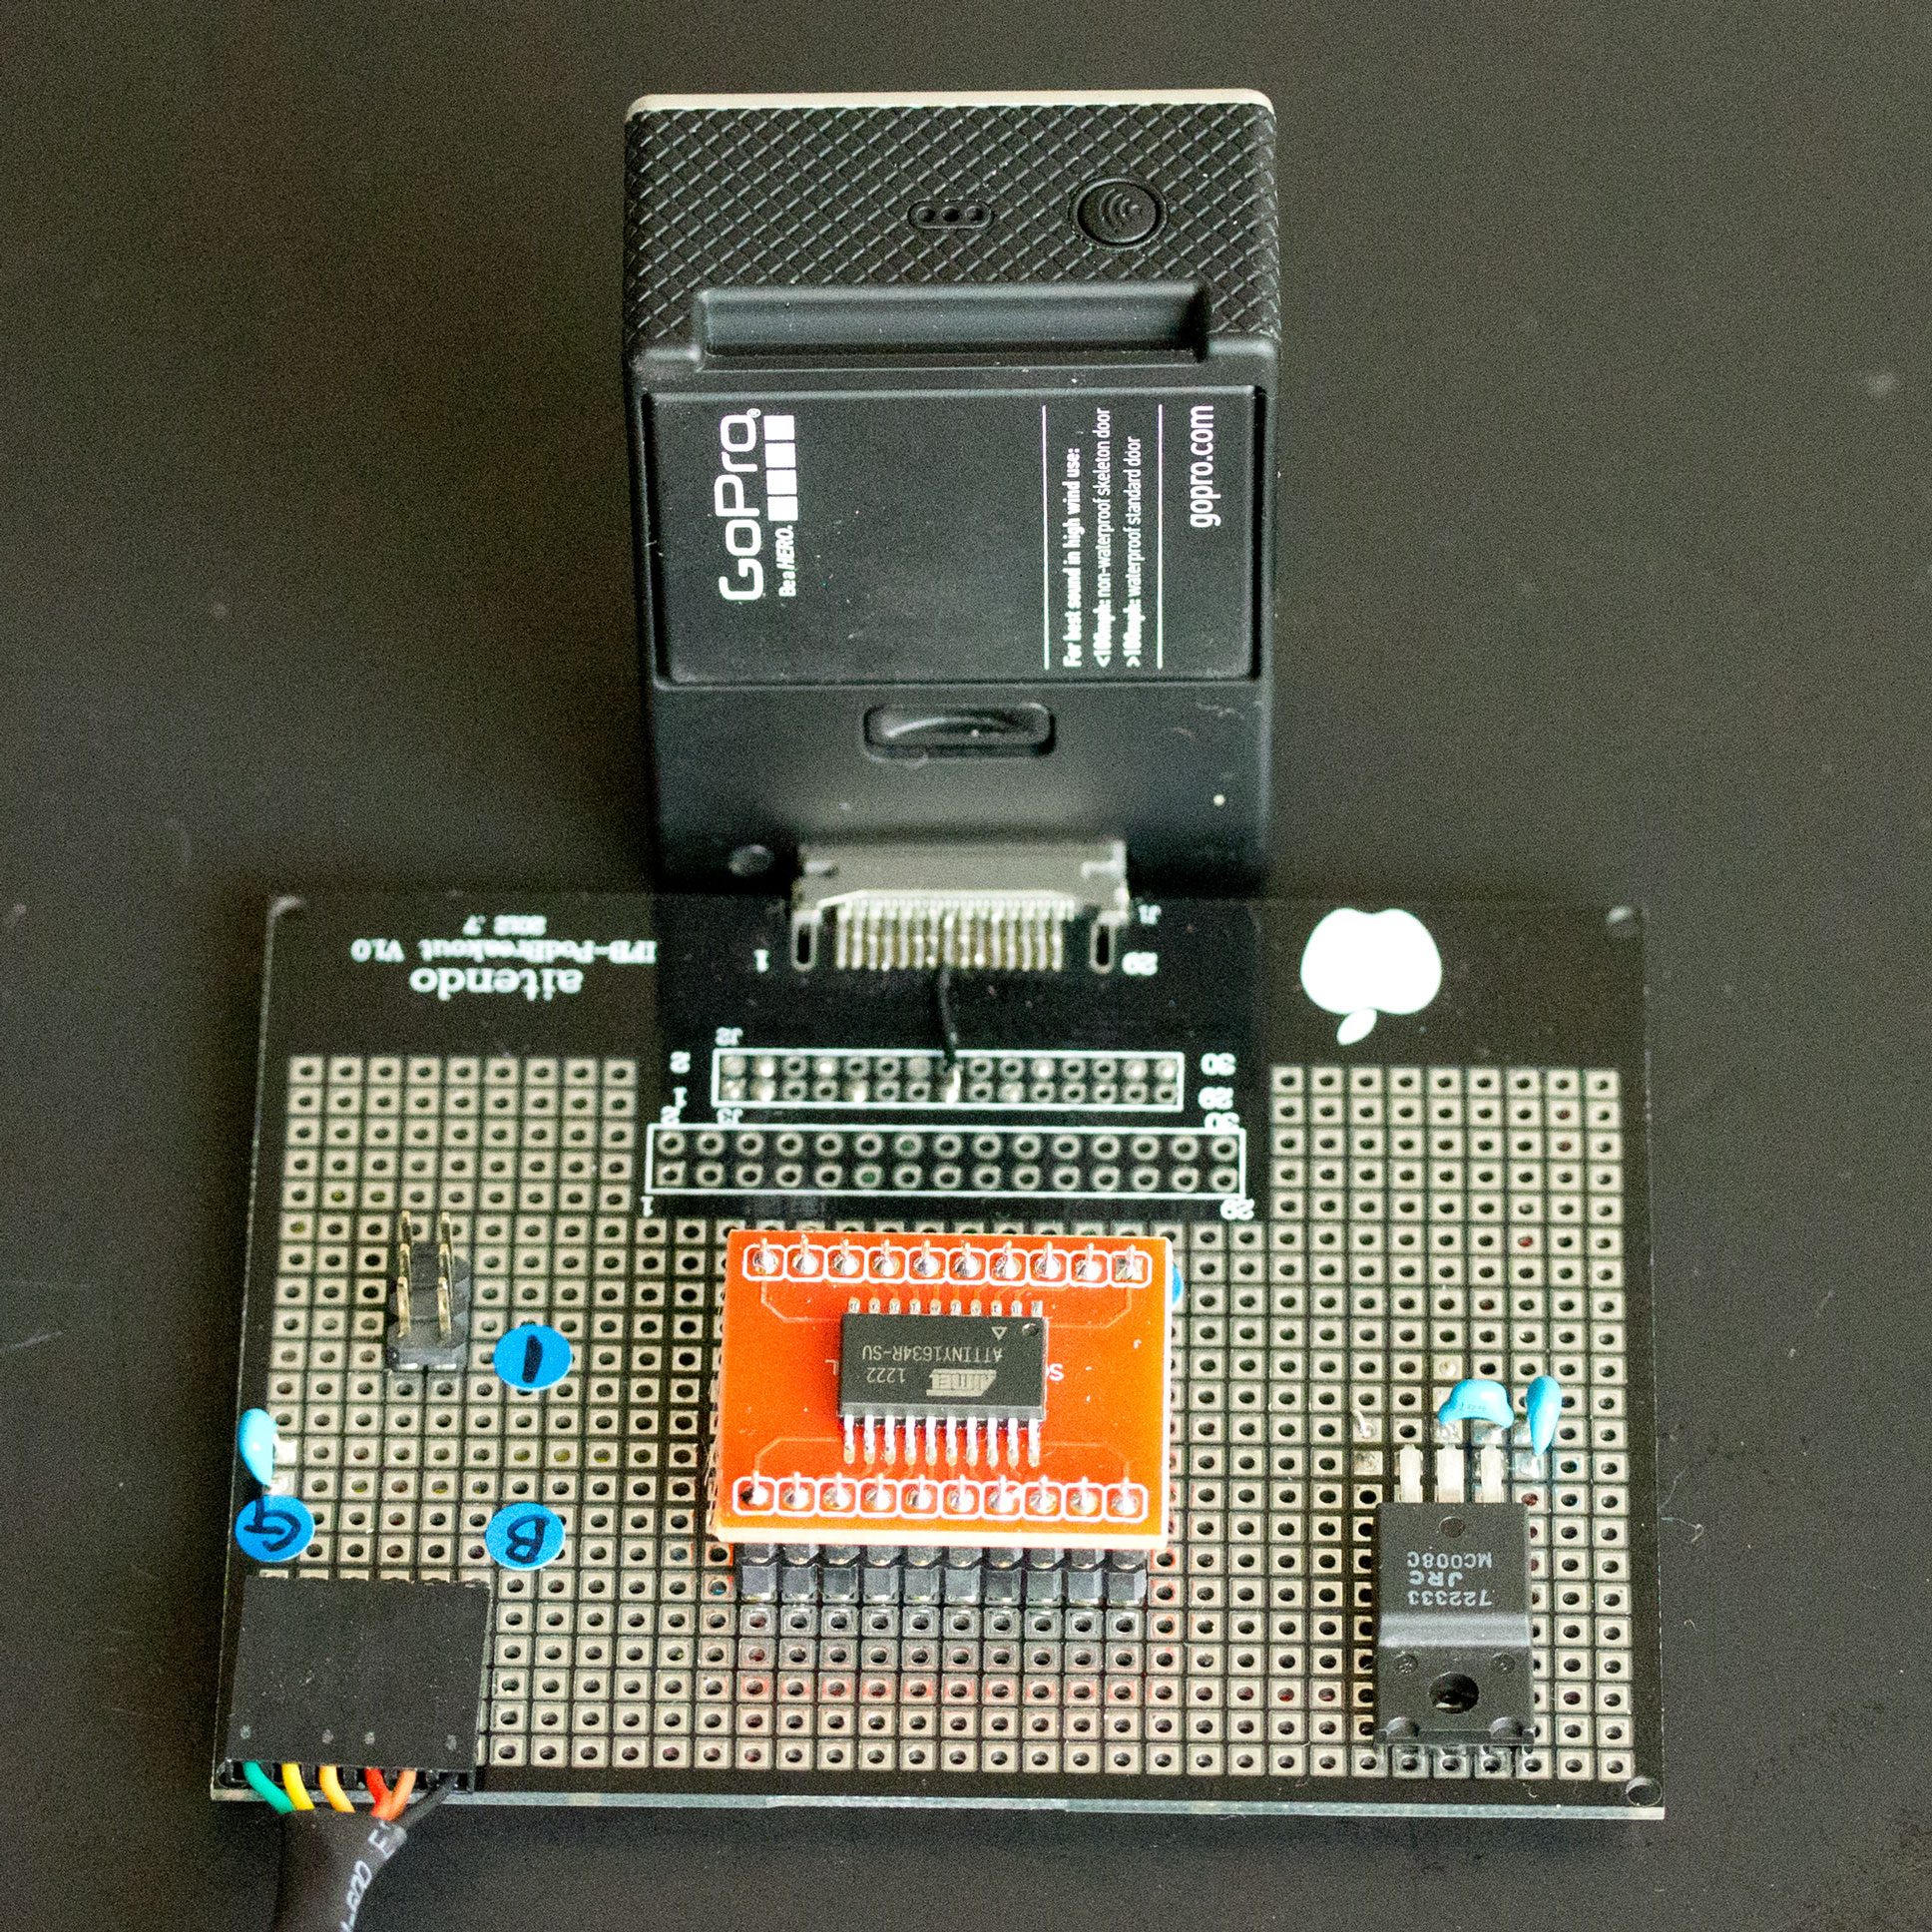
The following photos are a prototype of MewPro Cable using ATtiny1634.
The post is to show you how Genlock Dongle(s) and MewPros work and to explain how to wire them.
Two GoPro Hero 3+ Blacks can record videos/photos in genlock by using Dual Hero System. But more than two it was impossible by now. MewPro Genlock Dongle is a hardware emulator of GoPro camera who communicates with Dual Hero System and steals the required signals, VSYNC and HSYNC, that are generated by Dual Hero System.
How Dongle Works
Here is a demo video of syncing four GoPros. They sync when power on/off, changing modes/settings and shooting.
To make the above video we use the following items:
qty
GoPro Hero 3+ Black
n
MewPro
n-1
Genlock Dongle
1
USB battery pack
1
Cables and wires
(Note: n is the number of cameras. In our case n=4.)
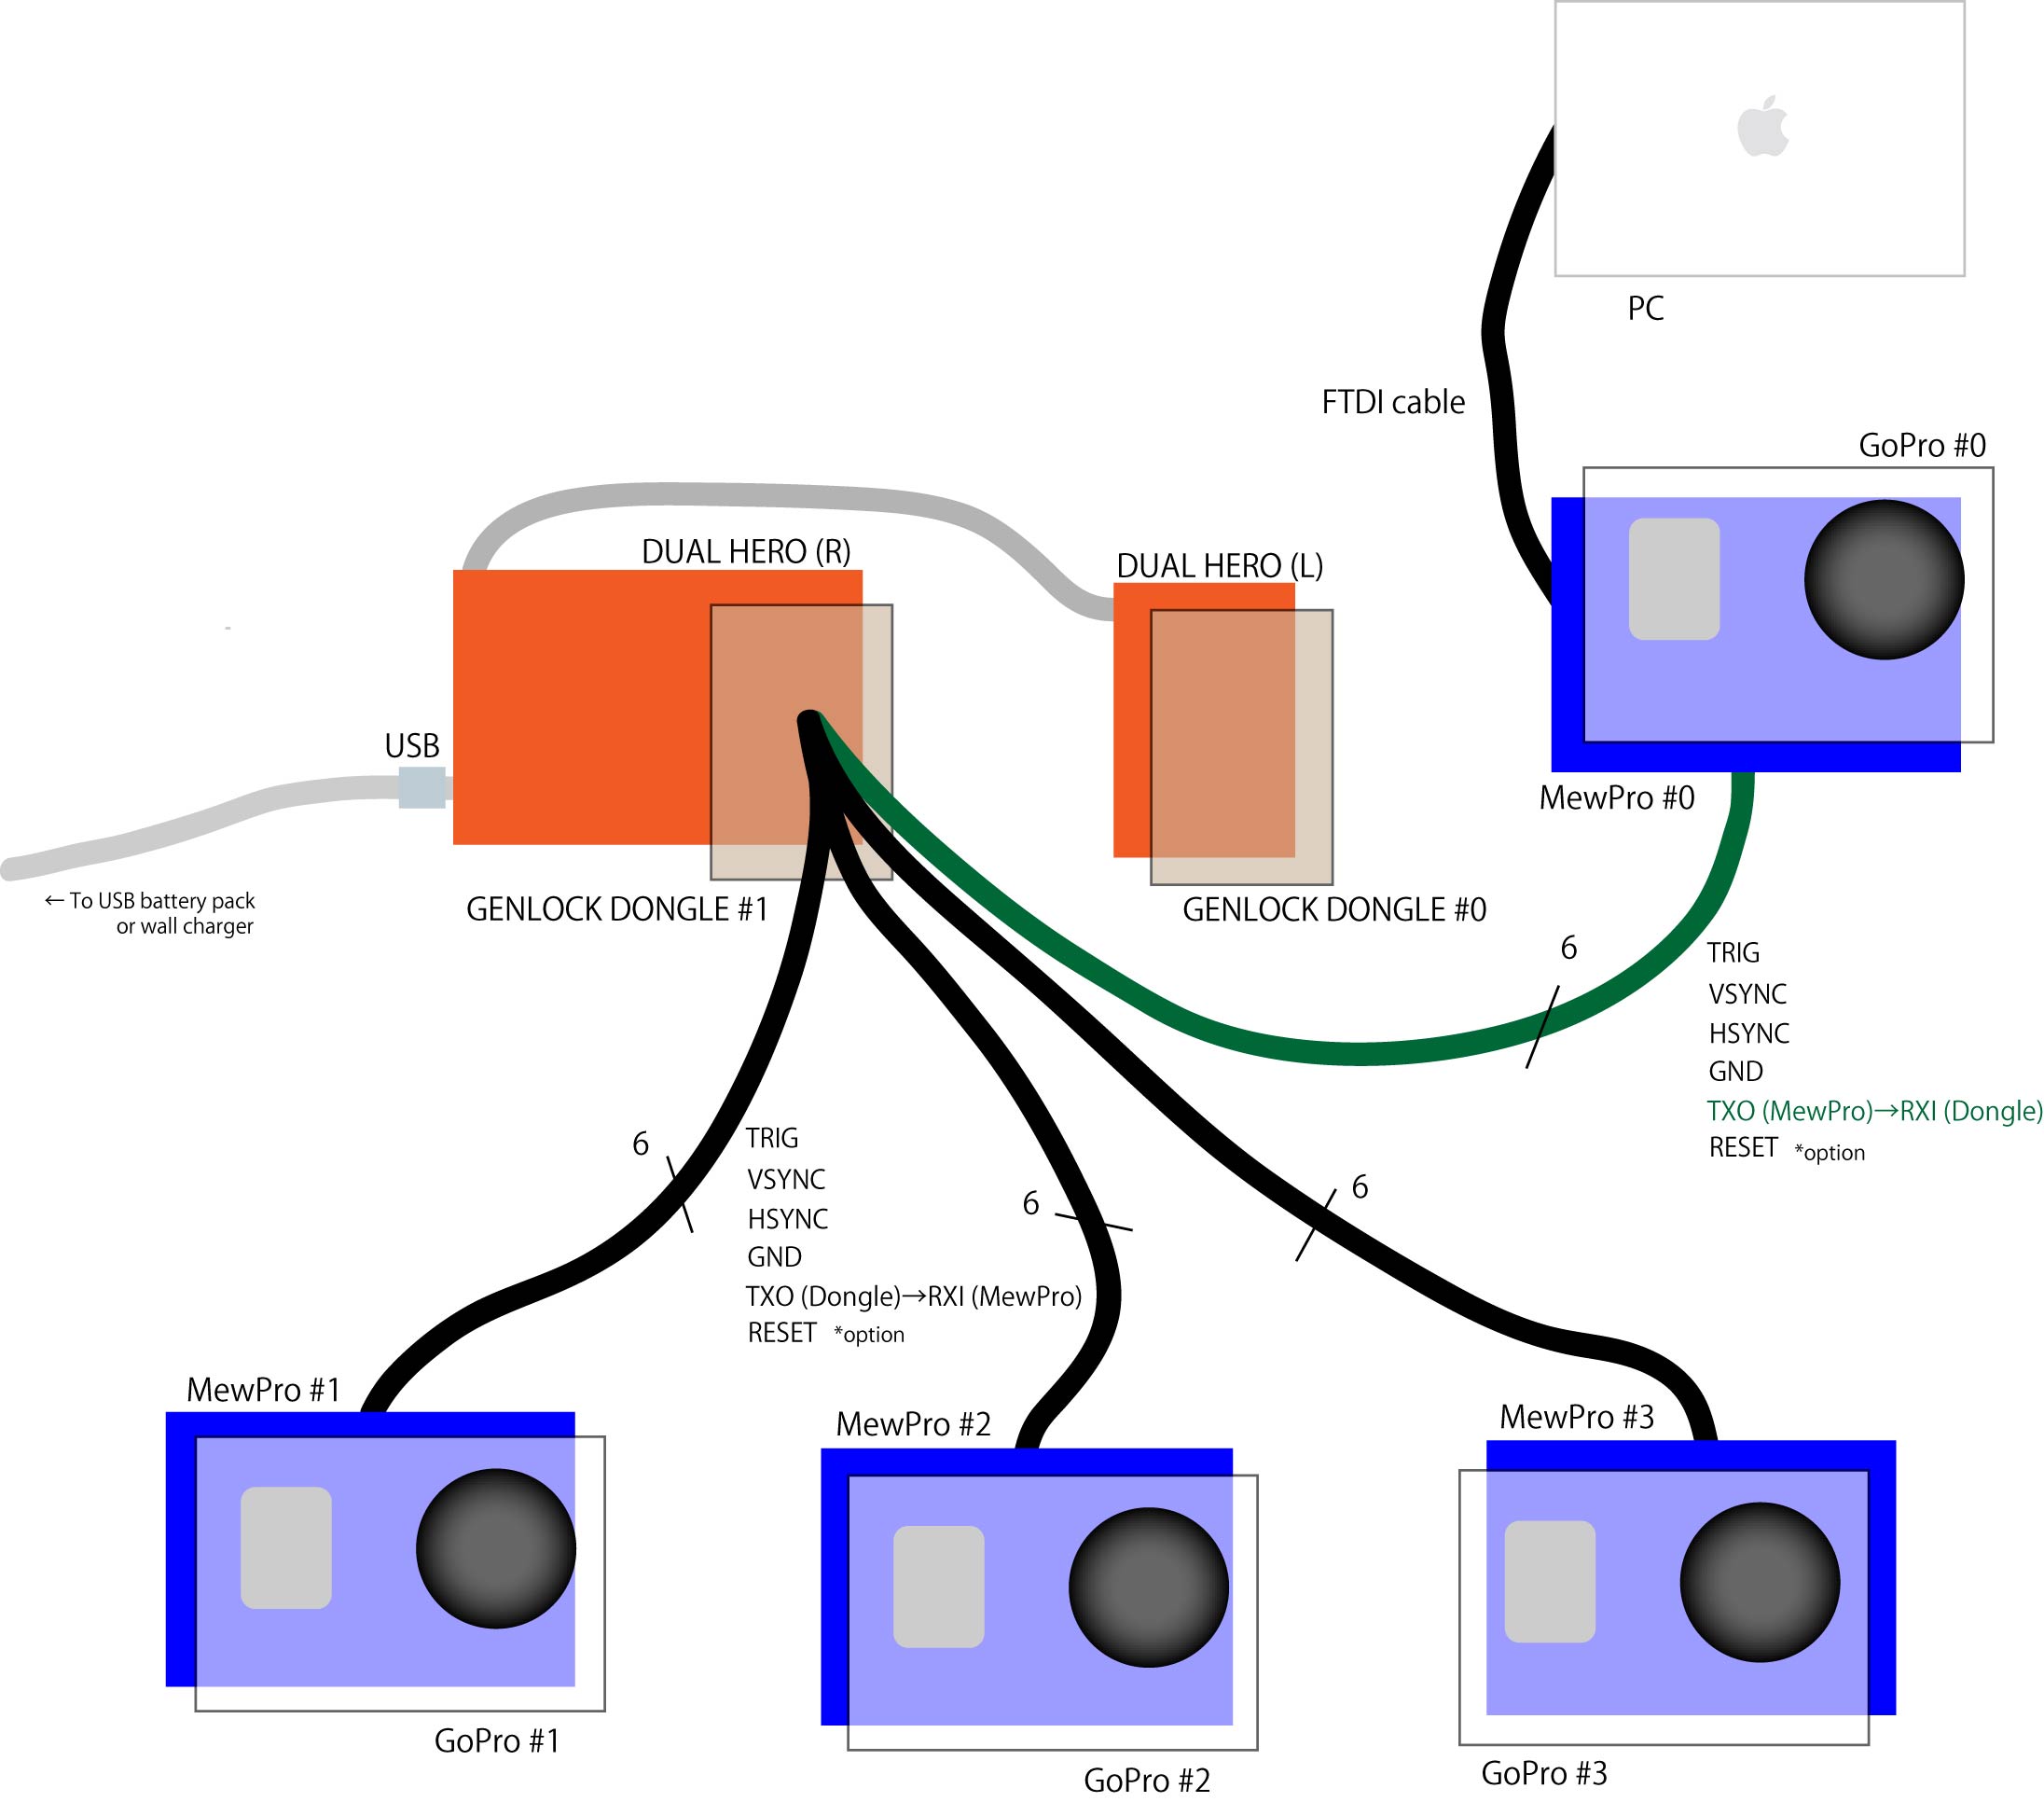
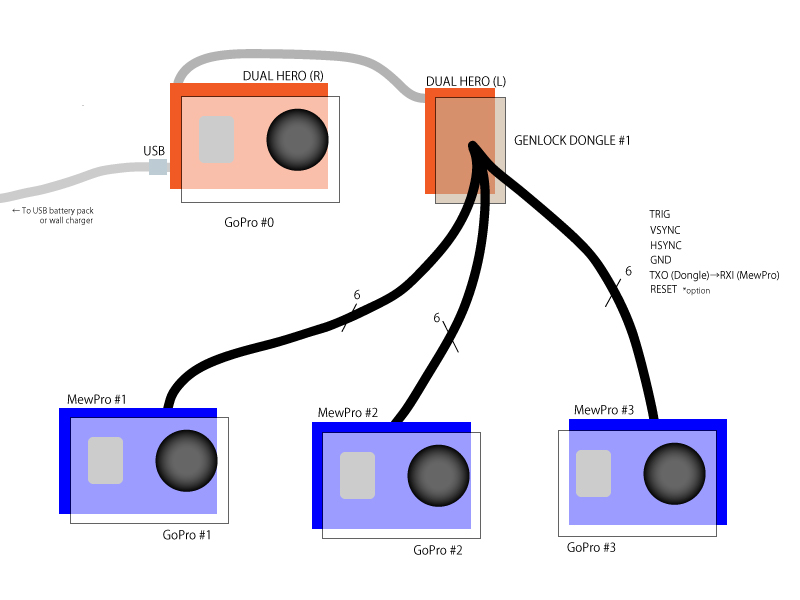
These items are connected as follows: Single dongle configuration
TRIG: Generated by Dual Hero for start/stop recording
VSYNC: Generated by Dual Hero for syncing frames
HSYNC: Generated by Dual Hero for syncing scan lines
GND: Signal ground
UART lines (TXO/RXI) are used by MewPros and Dongle(s) for transferring settings/modes from GoPro #0 to other GoPros (*)
RESET line is optional but useful when an error occured. Depressing a reset button on any Arduino Pro Minis will reset all the boards, which has the same effect as detaching/attaching the boards manually
A USB battery pack or wall charger is needed to power the dongle through USB connector of Dual Hero.
* Note: GoPro #0 controls everything: Modes, settings, and start/stop recordings. Commands from GoPro #0 are distributed to other GoPros through UART lines. This transfer is one way without feedback; if another GoPro is busy to do something a message from #0 may be ignored. However, since UART lines are nothing to do with TRIG/VSYNC/HSYNC this unreliability only happens before or after recordings and doesn’t harm video/photo quality.
Alternate Configuration
The above single dongle configuration is normally sufficient and recommended for any new installations of many GoPros in a rig as it needs the minimum number of equipments. But in some cases or already existing rigs following another configuration may be preferred:
qty
GoPro Hero 3+ Black
n
MewPro
n
Genlock Dongle
2
USB battery pack
1
Cables and wires
(Note: n is the number of cameras. In our case n=4.)
The wiring is as follows: Double dongle configuration
Advantages of double over single include symmetric wiring (except the UART line between MewPro #0 and Dongle #1) and the less space required on the back of GoPro #0.
Here is the similar demo of the double dongle configuration: Power on, changing modes, shooting, power off.
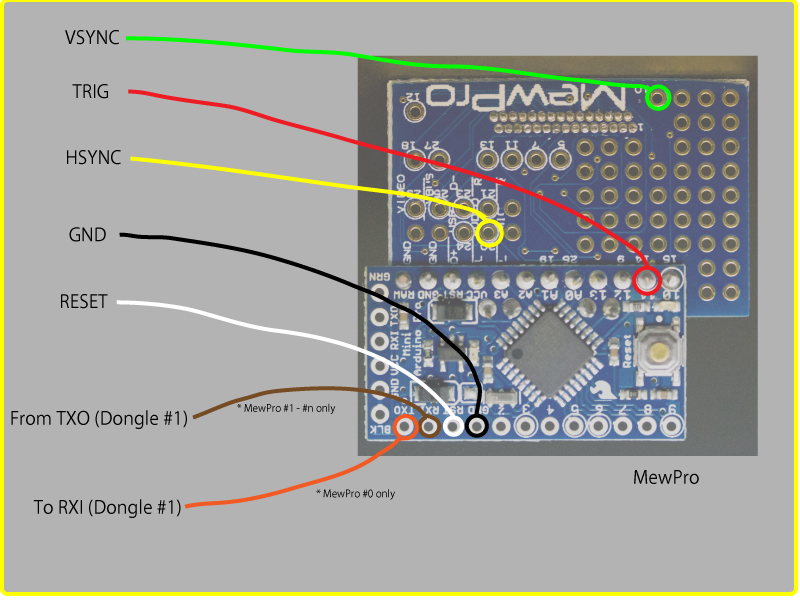
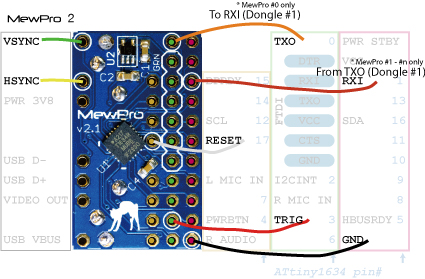
How To Wire Boards
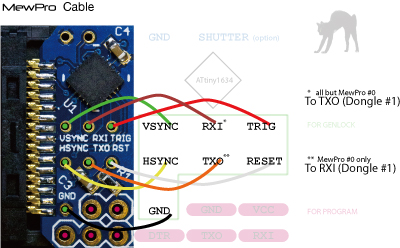
Both in single and double dongle configurations connections between Dongle #1 and MewPro #i (i=0,1,2,…,n) is summarized as follows:
It is clear that the only difference on wiring in two configurations is whether MewPro #0 exists or not.
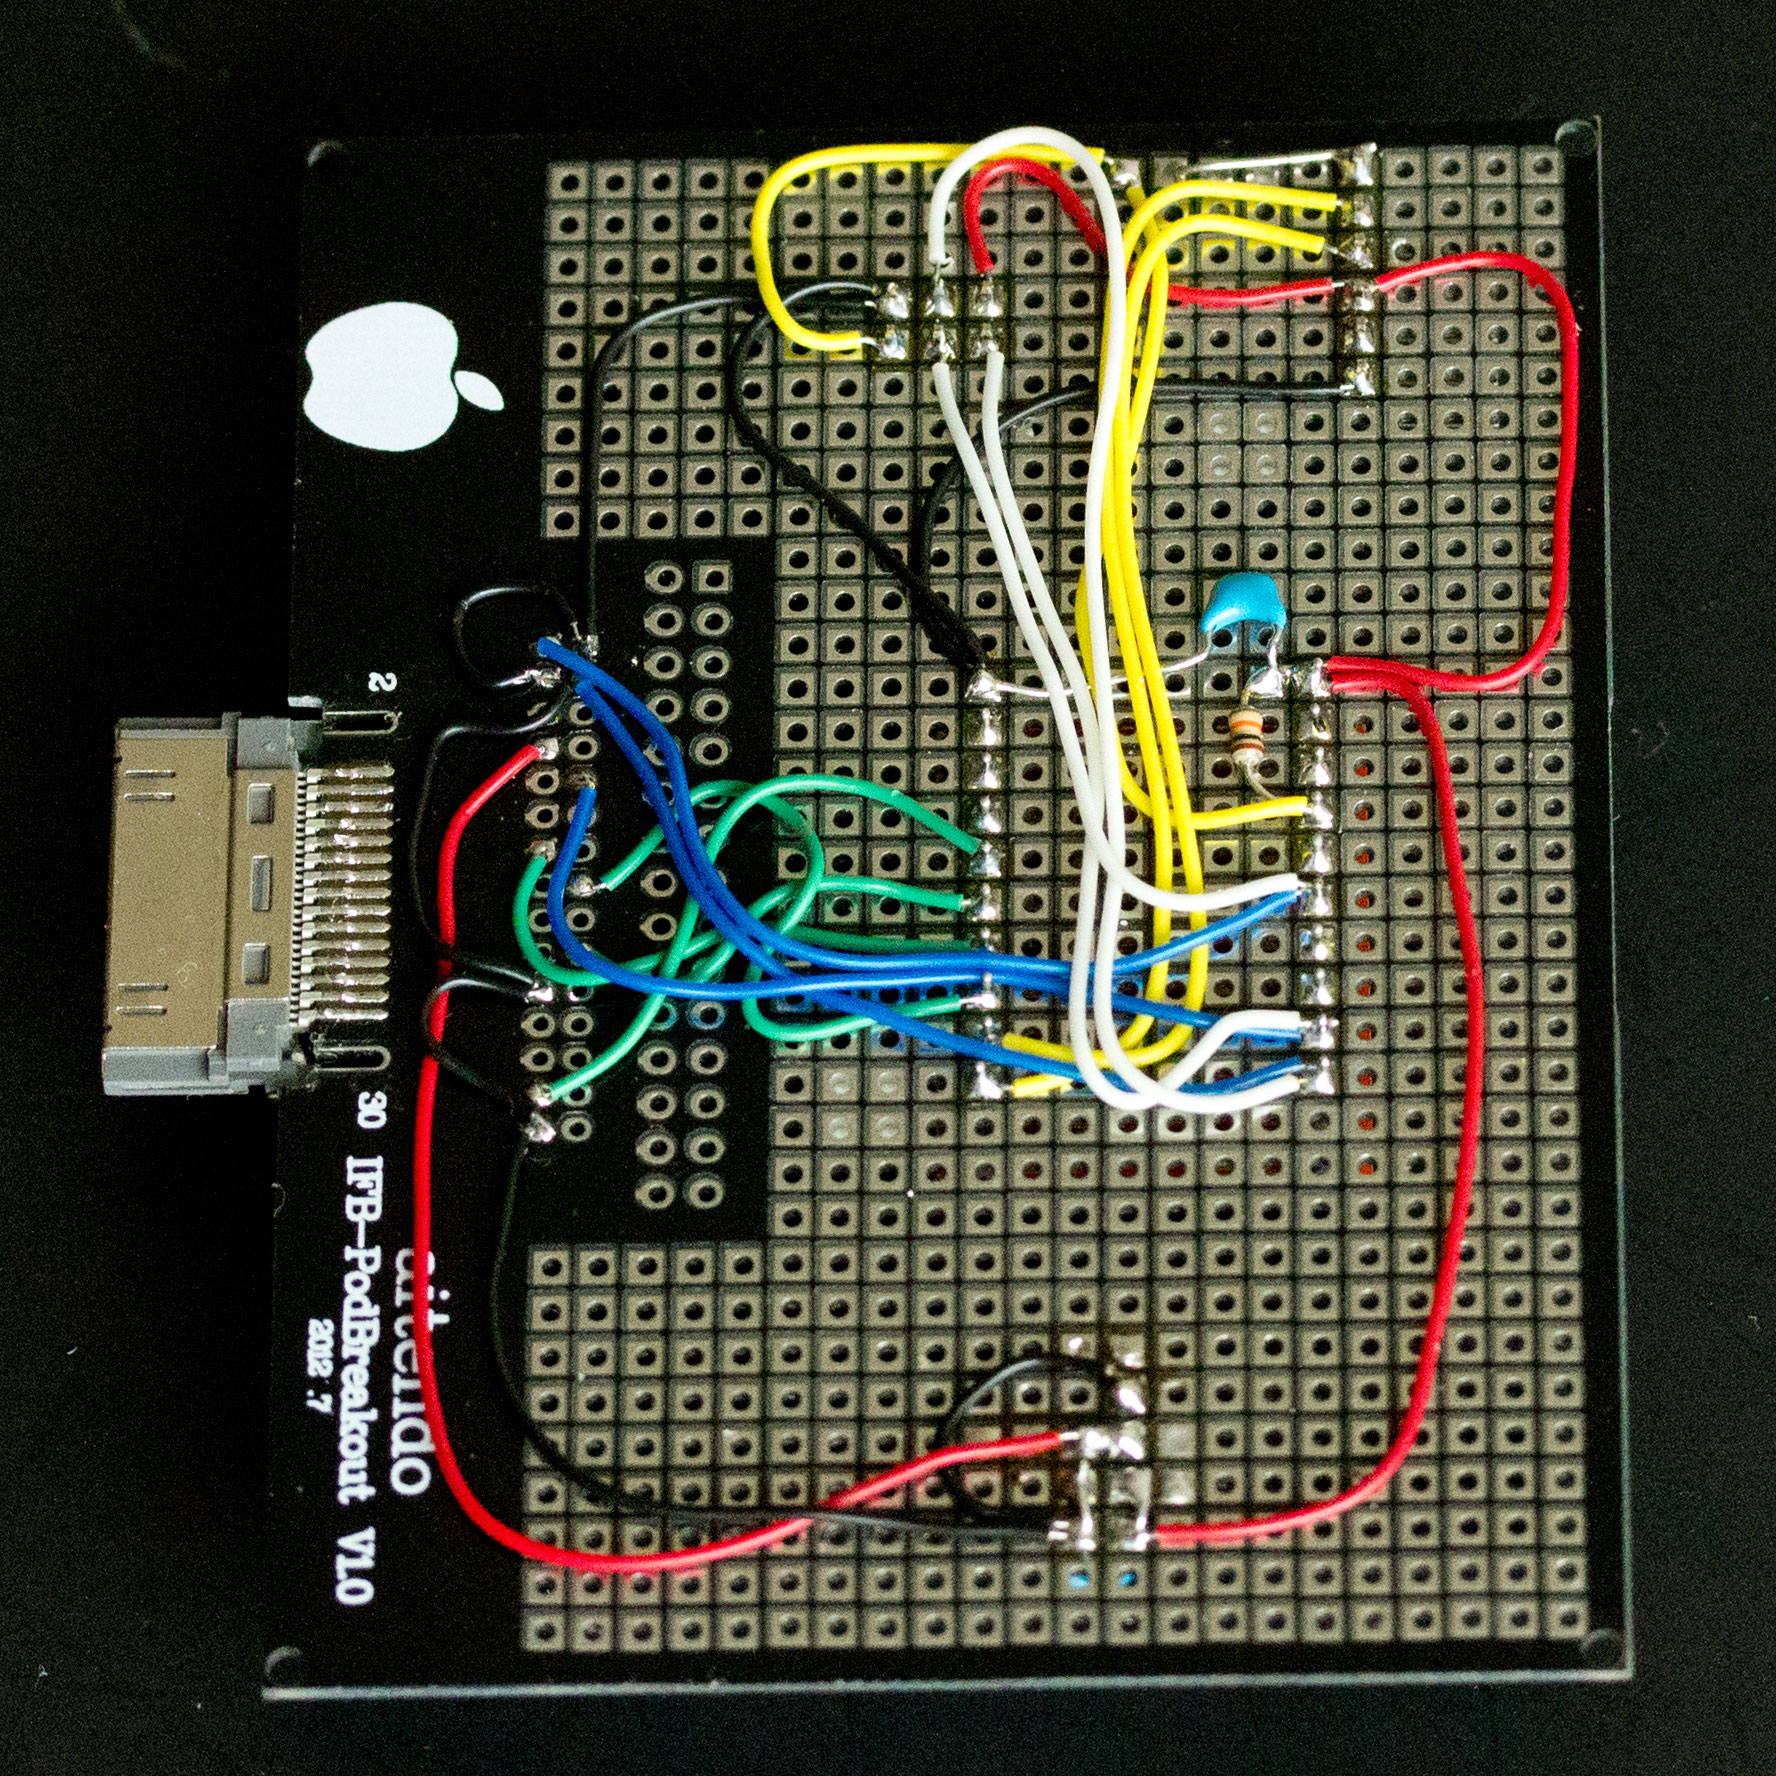
All of these wires need to be soldered by yourself to the boards: Please refer the following pictures. Wires to Dongle #1
Wires to MewPro 1Wires to MewPro 2Wires of MewPro Cable
(Update:29 Jun 2015, 7 Sep 2015. Added figures for MewPro 2 and MewPro cable boards.)
Remark: We only confirmed the configurations work with four GoPro Hero 3+ Blacks and the wire length less than 30cm. If your number of cameras or length of a wire exceed these limits there is no warranty but there is always hope: Please try shortest lengths of wires as possible!